6.28.2017

Popular Magazines – Public Libraries


Click above to access popular public magazines through the State of Connecticut's Library!
Magazines include:

The Atlantic
National Geographic
The New Yorker
Newsweek
Time
Consumer Reports
People
Rolling Stone
Smithsonian 
Money

Any many more!

6.27.2017

Common Sense Media: Facebook, Instagram, and Social

Social media isn't simply a way of life for kids -- it's life itself. To help them keep their online interactions safe, productive, and positive, we offer the most up-to-date research and guidance on social media basics. Learn about the latest apps and websites, and get tips on talking to your kids about sharing, posting, and avoiding digital drama.

https://www.commonsensemedia.org/social-media

1.25.2017

How to Create an Online Slideshow from Your Google Slides Presentation

Want to share your awesome Google Slides presentation with the world? By publishing it to the web, you can.

  • In Slides, head to File > Publish to the web. 
  • There are two options here: You can either generate a link that you can send to anyone, or you can embed your presentation on your website instead. (Just copy the code it generates and paste it on your site).
  • There are a few customization options too.
    • You can set your slide size, set the timing for when slides should auto advance, start the slideshow as soon as the player loads, and/or restart the slideshow after the last slide, so that the presentation loops.
    • If you want to require viewers to sign in with their account on your domain, check the box at the bottom. This is a handy option if you’re creating private content that you want to share with people at your organization only.
  • Once you’ve customized everything to your liking, hit Publish > OK. 
  • Any changes you make to your presentation will automatically be reflected in the online version of your presentation, so it will stay up to date.
  • To stop publishing at any time, head to File > Publish to the web > Published content & settings > Stop publishing.

1.10.2017

OER Commons

https://www.oercommons.org/

The worldwide OER movement is rooted in the human right to access high-quality education. The Open Education Movement is not just about cost savings and easy access to openly licensed content; it’s about participation and co-creation. Open Educational Resources (OER) offer opportunities for systemic change in teaching and learning content through engaging educators in new participatory processes and effective technologies for engaging with learning.

ISKME's OER initiatives aim to grow a sustainable culture of sharing and continuous improvement among educators at all levels. In 2007, ISKME launched OER Commons, its digital public library and collaboration platform, informed by the organization's pioneering efforts in knowledge management and educational innovation. OER Commons offers a comprehensive infrastructure for curriculum experts and instructors at all levels to identify high-quality OER and collaborate around their adaptation, evaluation, and use to address the needs of teachers and learners. Diving into OER Commons is an exciting opportunity to collaborate with other educators and learners, at the forefront of a new educational era.

OER Commons forges alliances between trusted content providers and creative users and re-users of OER. In addition to content partnerships, OER Commons, and its creator, ISKME, builds strategic relationships with organizations, consortia, states, districts, and others, in order to develop innovation and new research focused on OER, to advance the field of open education, and to build models for its sustainability.

Supported in part by the William and Flora Hewlett Foundation, ISKME, the Institute for the Study of Knowledge Management in Education, created OER Commons as part of the Foundation’s worldwide OER initiative.

From content, to infrastructure, to policies, many individuals and organizations work to make open content for all a reality. We acknowledge our partner organizations for their vision, expertise, and collaborative know-how

12.01.2016

Introducing Plus Portals

KCHS is introducing a new platform to communicate with our families called Plus Portals, by Rediker. We will no longer be using Edline.

Plus Portals is a cloud-based application integrated with the KCHS student information system. This application provides access to student class pages where you will be able to see your students' grades, progress reports, schedules, attendance and discipline records along with teacher contact information.

It also makes available school-wide information such as event dates, school announcements, and resources (forms, handbooks, etc). Please look for the activation email and click on the link to set up your Plus Portals account.


Learn to track your child's classroom progress, communicate with teachers, and stay updated on what's happening at school through our hands-on interactive guides and videos.

The ParentPlus web portal connects parents and students with schools and teachers. As a parent, you can quickly stay informed about what's happening at the school and your children's classes—from knowing if the school is closed on a given day to seeing how well your child did on his or her last homework or exam. With features such as E-Locker, uploading homework as a parent or student is a breeze and only a few clicks away.

Check out these interactive guides to help you learn to navigate the new portal!

6.14.2016

5 places where any kid can learn how to code

TED-Ed coding image 3
“The kids of today tap, swipe and pinch their way through the world. But unless we give them tools to build with computers, we are raising only consumers instead of creators,” says programmer Linda Liukas. That’s why parents and teachers should introduce coding as a creative act — a playful form of making that requires imagination, bravery and perseverance. Ready to teach your kids how to code? Here are 5 great places to start.
Hello Ruby is a whimsical website (and book!) created by Liukas to explain programming fundamentals to kids. The detailed lesson plansare appropriate for kids 5+.
Code.org teaches students the basics of programming through a free series of guided exercises — and is one of several resources on this list to be recommended by the TED Technology Team. To bring coding into your classroom, check out the Hour of Code model.
Created and maintained by the Lifelong Kindergarten Group at MIT’s Media Lab, Scratch is a both a programming language and an evolving community of young coders. To get started, dive into these resources.
Will the next generation of computer scientists include more Ada Lovelaces? Yes, if teachers and parents inspire more girls to start coding — and to embrace risk. “Most girls are taught to avoid risk and failure,” says founder Reshma Saujani. “Coding is an endless process of trial and error.” Learn more about the Girls Who Code curriculum here.
Even a Waldorf school can get excited about these computer science teaching tools. “CS Unplugged has activities you can do without a computer to teach programming fundamentals,” says Liukas.

6.10.2016

How to Search For (and Add) Free Images Right Within Google Docs

If your document needs some imagery, you can insert free images from right within Google Docs. You don’t need to be out scouring the Internet every time you need an image. Instead, you should learn to take advantage of the free tools right within the app that will allow you to search for and insert images in your doc in just a few easy steps.

In Google Docs, click on the Insert menu at the top of the screen, and scroll down to Image.
In the window that opens up, you’ll see all the usual options for inserting images from your drive, from a URL, or from your computer. However, you should also see the Search option on the far right hand side of the window. Click on that.
Here you will get a search bar. The results that are displayed will be labelled for commercial reuse with modifications, so you know that you can safely use these images. Search for the keyword(s) you’d like. The search pulls from Google, LIFE and stock images.
Click on the image you want. Click Select, and it will insert into your document. From there, you’re free to adjust or resize it as required.

6.08.2016

Advanced Tips and Tricks for Google Slides

You might already know the basics for making awesome presentations using Google Slides. But there are a few more features you can use to make your design and flow even better. To learn a few advanced tips and tricks, check out the latest episode of The Apps Show from our friends on the Google for Work team.

In the most recent Apps Show episode, Googlers Drea Alphonso and Jimmy Tran explain how to create your own customized template by using master slides; how to embed YouTube videos or charts from Sheets into your slides; and how to use the new Slides Q&A feature. Check it out, and you might even catch their shoutout to BetterCloud’s popular tutorial on how to become a Google Slides artist with these 7 tricks.

6.03.2016

How to Reset and Replace Images in Google Docs

When you’re working with images in Google Docs, there are a few useful functions, like “Reset Image” and “Replace Image.” Here are some tips for when and how to use them.

Reset Image
If you have an image in Google Docs and you’ve applied edits to it that you don’t like, rather than Undo-ing each step, it’s easier just to revert to the original and start from scratch. To do so, right click on the image > Reset image. The image snaps back to its original properties, and you can quickly undo multiple changes at once.

Replace Image
If you like the formatting you’ve done to your image but want to use another image instead, right click on the image > Replace image. The formatting (i.e., size, layout, properties) stays the same, but the original image is replaced by your new choice. This feature can be useful for replacing images in templates.

6.02.2016

How to Use Goals in Google Calendar

We all have different types of goals that are important to us, like getting healthier or building a new skill. Finding the time to work toward those goals can be very difficult with all of the work, social, family, and other obligations that most of us have in our lives. Google has recognized that difficulty, and there’s a solution inside of its calendar app to help make achieving your goals a little easier.

Although goals that you create will show up in the desktop version of your Google Calendar, you can only create those goals from the mobile app. We’ll demonstrate how to do this from the iOS version, but you can also also add goals from the Android Google Calendar app.

5.31.2016

An Introduction to Google Spaces

Last week, Google announced a new app: Google Spaces. The idea behind Spaces is to create topic-based, shareable spaces that allow you to make a space about anything that interests you and then share it with your friends. Here’s a quick tour of Spaces.

For desktop:
To create a space, go to Google Spaces and click Create a Space.
Name it, and then you can send out invitations to the space. You can send out the link by copying it, emailing it directly, or sharing it via Facebook.
Spaces also has a mobile app. The video tutorial demos it on iOS, but it’s also available on Android.

For mobile:
Mobile has some expanded options for sharing, including sharing via a message (e.g., text or email). This is a convenient way to share mobile content.
Spaces integrates with Google search and YouTube. So you can search for a video in YouTube, view it, and then share it–all without ever having to leave a single app. This is great for a streamlined content browsing and sharing experience.
You can have conversations about content within Spaces and stay focused on the topic of a given space.
If you want to search through your spaces, you can use the search bar at the top of the screen.
Try it out for yourself and see what you think.

5.26.2016

How to Create a Word Cloud in Google Docs

Creating a word cloud in Google Docs is a creative way to visualize the text you’re working on. It allows you to see what words are being used the most, so you can get a quick sense of your themes emerging in your writing.


  1. In a Google Doc, navigate to the top your screen. Click Add-ons > Get add-ons.
  2. Search for Word Cloud Generator.
  3. Once you find it, click on the “+ Free” button to install the add-on. You’ll get a notification in Google Docs that Word Cloud Generator has been added to your add-ons menu.
  4. To create your word cloud, Click on Add-ons > Word Cloud Generator > Create Word Cloud. 
  5. The word cloud will form on the right side of your page, and it’ll be based on the words that are most commonly used in your document. The larger words indicate that they’re used more frequently. If you click on Append top word counts, it’ll create a table in your document that lists how many times each of your top words appears in your document.

5.20.2016

Tech Tip: How to create interactive timelines from Google Sheets

Timelines are useful tools for helping students conceptualize how individual events fit into a given time period. My favorite timeline app is TimelineJS, an open-source tool from Northwestern University’s Knight Lab that lets you build timelines from Google Sheets.
Here is one I built about the Japanese-American internment.
There are only four steps to creating a timeline. The app’s page outlines them, and includes links to templates, but here’s a quick overview:
  1. Open the Google Sheet template, remove the sample items and add your own content (dates, photos, Tweets, Google Maps, text and media links). The spreadsheet template includes a column for providing media credits. You can leave columns blank, but do not delete or change the column headers. Each row is for a new date and headline on your timeline.
  2. When you have finished adding your content, head to File > Publish to the web. Remember to click on the “Automatically republish when changes are made” option.
  3. Grab the link or embed code and you’re ready to share your timeline with your students — and the world.
And that’s it! Have fun creating your own timelines.
Gail Desler is a technology integration specialist for the Elk Grove Unified School District in California. She is a Google Certified Innovator, a Microsoft Innovative Educator, a National Writing Project Teacher Consultant and a Library of Congress American Memory Project Fellow. Gail co-directs the Time of Remembrance Oral Histories Project and co-curates the Digital ID Project. Follow her on Twitter.
*****
Tech Tips is a content collaboration between SmartBrief Education and GreyED Solutions. Have a tech tip to share? Contact us at techtips@greyedsolutions.com
Miss a Tech Tip? Visit our Tech Tip archive.

5.17.2016

Conquer Tab Sprawl With Google Chrome Keyboard Shortcuts on a Mac

If you use Google Chrome and you tend to open up lots of tabs during a browsing session, it can get hard to manage and organize all of your tabs. Here are a few fast and effective keyboard shortcuts to conquer “tab sprawl” and navigate your tabs quickly.

Command + L = Highlight the URL in a tab
Command + Option = Navigate between tabs by holding these down and moving the right or left arrow
Command + W = Close current tab
Command + T = Open new tab
Command + Shift + T = Open the last tab you closed
Command + Shift + click a link = Open a link in a new tab

Note: These commands are for Macs. Most of these shortcuts will have an equivalent on the Windows version of Chrome by using the Ctrl key instead of the Command key. 

4.26.2016

4 Things You Can Do Right Now to Create a Perfectly Organized Google Drive

Everyone organizes their Google Drive differently. Shockingly, many Google Apps users don’t organize them at all. I have found that, by using a few best practices, there is a system for making Google Drive much more organized and easier to navigate.

Proper folder structure, naming conventions, color coding, and keeping track of what is shared with you can go a long way when used properly. These 4 tips show the best way to organize your Google Drive for faster navigation so you never lose track of a document again.

1. Folder Structure Comes First

The best starting point is creating a clean universal folder structure. An easy way to do this is to create a folder for each category of document and then make subfolders for each aspect of that category. An “uncategorized” folder can house all the documents that don’t fit into any of the other folders yet. Scan through the “uncategorized” folder regularly and sort its contents into the appropriate labeled folders if possible.
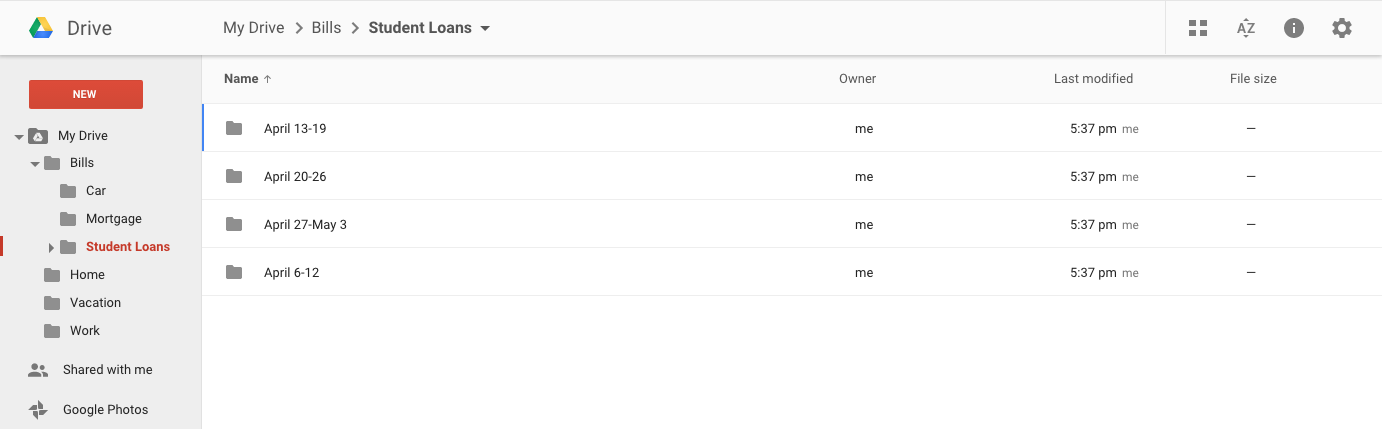
Within each subfolder, it is a good practice to create folders that are dated by week to keep track of the dates each document is created, that way no folder becomes too full and difficult to sort through.
To create a folder click the red NEW button and then select the option for folder.
folder-structure

2. Add Some Color

Google Drive has an awesome feature that allows you to color code your folders, this can be done in such a way that makes sifting through your drive much faster.
I made each folder in my drive a different color and then each subfolder a different shade of that same color. The dated weekly folders within each subfolder are the same shade as the subfolder it is contained within. This way, if I am looking at a folder titled “April 6-12” I can instantly tell what types of documents are contained in it simply by glancing at its hue.
To change the color of a folder click the arrow to the right of the folder name on the top bar then select the change color option.
add-color

3. Standardize Your Naming Conventions

Date created is a mysteriously absent field in Google Drive, instead you can only view when a document was last updated. Finding a document by it’s creation date is sometimes useful and more intuitive, which should be considered when designing your naming convention.
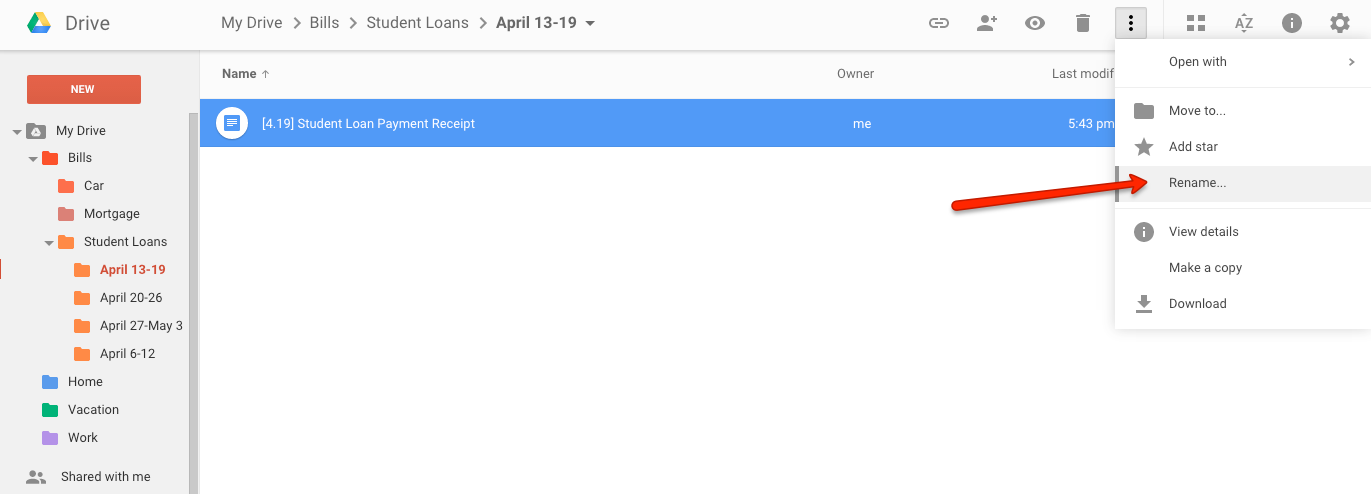
We think it is best to name every document in the following way “[DateCreated] DocumentName” and then let the folder structure and color coding do the rest. For example a student loan payment receipt created on the 19th of April would be titled “[4.19] Student Loan Payment Receipt” this will be easy to find whether you are searching for the date or the title of the document.
To rename a document, highlight the documents name in Drive and then click the three vertical dots on the right side of the top bar. Then select rename.
standard-naming

4. Shared with you, organized by you

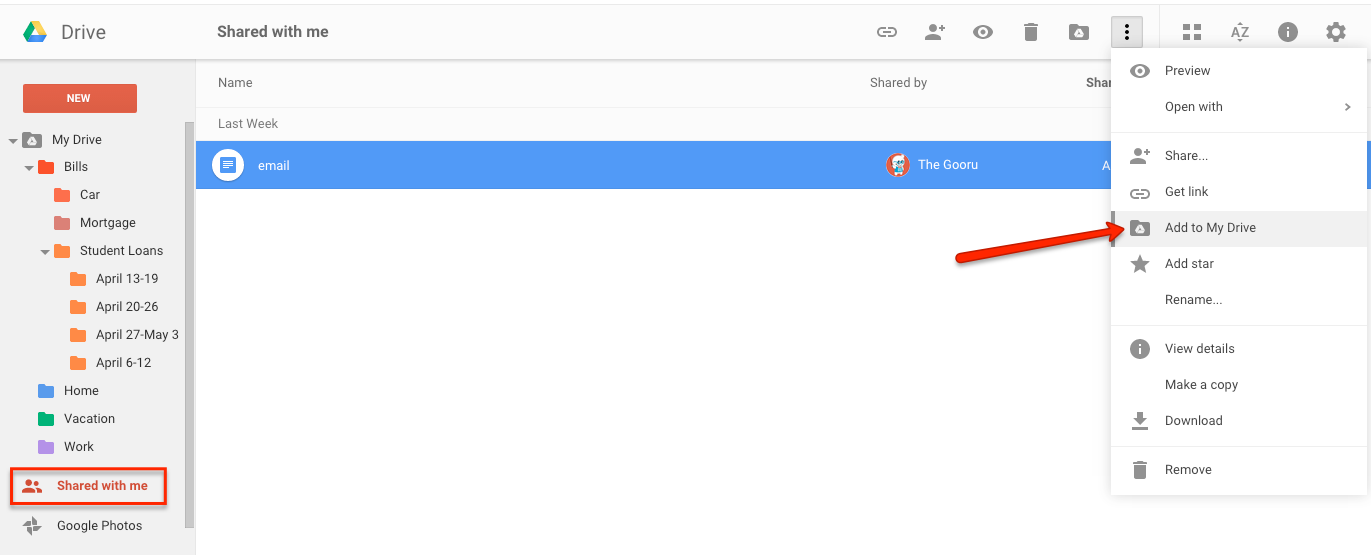
When a document is shared with you, it can be hard to locate because it is not automatically added to your My Drive folder. Make sure to add the file to the appropriate folder in your My Drive. If it does not adhere to your naming conventions, create a folder that fits the naming convention and add the shared file to that folder.
shared-with-you
To add a document that is shared with you to your My Drive, highlight the document in theShared with Me folder and then click the three vertical dots on the right side of the top bar and select Add to My Drive from the dropdown menu.

4.18.2016

Quizlet Live

Teachers--are you looking for a fun, engaging game for your classroom where students can learn from each other? That’s why we built Quizlet Live. It’s designed to bring fresh energy into classroom. Teams of students work together, racing to learn the material in a Quizlet study set. Correct answers move teams ahead, but wrong answers send teams back to zero. In order to win, students need to communicate with each other to make sure they pick correctly.

How Quizlet Live works
Teachers can launch Quizlet Live from any study sets and create a game in seconds (no accounts needed for your students). Just ask your students to type in quizlet.live on any device (computers, mobile phones, iPads etc) and enter the unique join code on your screen.

4.12.2016

3 Google Apps Tools You Didn’t Know You Could Use Offline

Whether you are on a plane, on the subway, or just trying to conserve data usage, there are plenty of times when you will find yourself unable to connect to the internet. This doesn’t mean your work needs to be immediately substituted for a new game of Angry Birds. Google provides plenty of tools that can be used while offline.

You can read and compose emails, view and edit Drive files, and even navigate to your next destination with Google maps, all while “off the grid.” I find these features essential during long commutes or in the off chance, in a power outage. These are three of my favorite offline Google Apps tools that you can use while disconnected. Additionally, the above video from The Apps Show highlights more offline tools that allow you to keep working, even when your internet is not.


1) How to Access Gmail Offline


2) Accessing Google Drive Offline


3) Navigate the world without navigating the web


What happened to the good old days of big paper maps that you kept folded up in your glove compartment? Remember when no data plans or Wi-Fi were necessary to find your way? Well, as it turns out, those days are still here but the maps are folded up on your mobile device. Available for iOS and Android devices, the Offline Maps function allows you to navigate the world much easier. Losing Wi-Fi can happen when we least expect it, and when we lose it on our way somewhere, this feature is a saving grace.


Now you can load, download, and share a map before your journey begins and never risk the chance of losing your directions. With this setting you can save areas like your office and home, and adjust the settings to update those maps automatically. You can also save places temporarily before you step out the door. When you save places, other information becomes available too such as business hours and contact information for nearby places.

(From: www.thegooru.com)

4.06.2016

Nearpod

Learn how to use Nearpod to push content out onto student devices, including iPads, Android tablets, chromebooks, laptops, and more. You can send images, videos, quizzes, drawing activities, and more to student devices.